Calibration and Bump Testing Procedures
Intro Paragraph: Bump testing and calibration are pivotal procedures in maintaining the effectiveness and accuracy of gas detection instruments. Bump testing, a brief exposure of the sensors to a specified concentration of gas, verifies sensor and alarm functionality, while calibration, a more thorough adjustment performed regularly, ensures that the readings provided by the sensors remain accurate over time. These procedures, when carried out diligently, play a vital role in safeguarding the operators and ensuring a safe working environment by keeping the gas detection equipment in optimal working condition. When completed regularly, the procedures described below help to ensure gas detector operator safety.
Important Calibration and Bump Testing Concepts
Configuration: The configuration process allows qualified personnel to review and adjust a unit's settings.
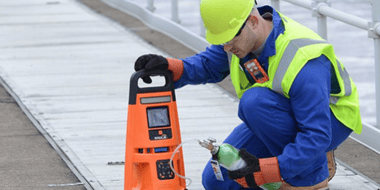
Bump Test: Gas Detection instruments are potentially life-saving devices. The only way to verify proper sensor and alarm operation is to perform a bump test. Bump testing is the process of briefly exposing the installed sensors to an expected concentration of calibration gas that is greater than the low alarm set point. Also referred to as a "functional test", the bump test checks for sensor and alarm functionality but does not measure sensor accuracy and no adjustments are made to the instrument during a bump test.
Zero: Zeroing sets each installed sensor to recognize the ambient air as clean air. If the ambient air is not truly clean air, any gasses that are present and relevant to the installed sensor type will be measured and displayed as zero. Readings will be inaccurate until the unit is correctly zeroed in truly fresh air or with a zero air cylinder.
Calibration: All sensors gradually degrade over time. Without regular calibrations, sensor readings during instrument use will not accurately display true gas concentrations. During the calibration process, the instrument self-adjusts so that the sensors retain their ability to correctly measure and accurately display gas concentration values. When a sensor has degraded beyond an acceptable level, it has reached its end of life and will no longer pass a calibration.
Peak Readings: The instrument stores the highest detected gas reading, the "peak reading" or "peak". Bump testing and calibration will often register new peak readings. Therefore, the clearing of the peak reading should follow each calibration. The instrument operator may also wish to clear the peak reading after a bump test, before a change in location, or after an alarm is addressed and cleared.
Note: The peak readings and the data log readings are stored independently of one another; therefore, clearing the peak reading does not affect the data log. Powering the instrument off or changing its battery does not affect the peak reading. These checks and balances help promote operator safety, and serve to contain the peak readings in a "black-box" manner. In the event of a gas-related incident, this black-box record can be useful to the safety team or a prospective investigator.
Self-test (for Tango TX1): The self-test verifies the functionality of the unit's memory operations, battery, and each alarm indicator (audible, visual, and vibration). It does not verify sensor functionality or instrument accuracy.
Bump Test and Calibration Procedure
Industrial Scientific minimum frequency recommendations for each procedure are summarized in the table below. These recommendations include a daily bump test for any Industrial Scientific gas detector that is not operating on DualSense. This includes the Tango TX1 when it is operating with only one working sensor.
When two redundant, working sensors are installed in the Tango TX1, the instrument is operating on DualSense and the probability of sensor failure – compared with a single-sensor instrument – is diminished regardless of bump test frequency. The frequency of bump testing for DualSense instruments, between monthly calibrations, is best determined by a company's safety policies. These policies may be affected by the directives and recommendations of regulatory groups, environmental conditions, operating conditions, instrument use patterns and exposure to gas, and other factors.
|
Procedure |
Industrial Scientific recommended minimum frequency |
|
Non-DualSense instruments
|
||
|
Configuration |
Before first use and as needed thereafter. |
|
|
Calibrationa |
Before first use and monthly thereafter. |
|
|
Bump Testb |
Prior to each day’s use. |
|
DualSense instruments
|
||
|
Configuration |
Before first use, when there is a change in the installed sensor type, and as otherwise needed. |
|
|
Calibrationa |
Before first use and monthly thereafter. |
|
|
Bump Test |
As desired between monthly calibrations. |
|
|
Self-testc |
Prior to each day’s use for an instrument that is always on or is left on. |
|
a Between regular calibrations, Industrial Scientific also recommends a calibration be performed immediately following each of these incidents: the unit falls, is dropped, or experiences another significant impact; is exposed to water; fails a bump test; or has been repeatedly exposed to an over-range (positive or negative) gas concentration. A calibration is also recommended after the installation of a new (or replacement) sensor. These recommendations are based on field data, safe work procedures, industry best practices, and regulatory standards to ensure worker safety. Industrial Scientific is not responsible for setting safety practices and policies.
b If conditions do not permit daily testing, bump tests may be done less frequently based on instrument use, potential exposure to gas, and environmental conditions. The frequency of testing instruments is best determined by company policy and local regulatory standards.
c The Tango TX1 self-test is performed automatically during the start-up process. It can be user-initiated from operation mode.
Note: The use of calibration gases not provided by Industrial Scientific may void product warranties and limit potential liability claims.
FAQs about Bump Testing & Calibration
What’s the difference between bump testing vs calibration?
A bump test verifies the sensor and alarm functionality by briefly exposing the sensors to a known concentration of gas, ensuring they respond correctly. On the other hand, calibration adjusts the sensors to measure gas concentrations accurately, compensating for sensor degradation over time. While bump tests are quicker and verify basic functionality, calibration is a more thorough process ensuring precise readings and overall instrument accuracy.
Why does the gas monitor require calibration and bump testing?
Gas monitors require calibration and bump testing to ensure accuracy and functionality, crucial for operator safety. Calibration compensates for sensor degradation, ensuring accurate gas concentration readings. Bump testing verifies sensor and alarm responses to gas exposure, ensuring they function correctly during hazardous gas presence. These procedures help maintain the device's reliability, thereby significantly contributing to a safer working environment.


